Cara Membangun PC Gaming pada tahun 2023 – Dexerto, Cara Membangun Ebook PC untuk Pemula #YesWebuild | MSI
Panduan Pembuatan PC yang lengkap untuk pemula
. Chipset menyediakan opsi dan konektivitas di motherboard, dan chipset dengan harga lebih tinggi menawarkan lebih banyak fitur. Ada banyak chipset yang berbeda, jadi untuk menyederhanakan, semakin tinggi nomor chipset, semakin banyak fungsionalitas motherboard Anda.
Cara Membangun PC Gaming di 2023
Dexerto
Apakah Anda ingin membangun PC game di tahun 2023? Jika demikian, Anda telah datang ke tempat yang tepat. Panduan ini akan memandu Anda melalui seluruh proses, dari memilih komponen yang tepat untuk merakit rig Anda.
Membangun PC game yang kuat adalah impian setiap gamer. Kami semua menginginkan rig game yang dapat menjalankan game paling tinggi secara efisien dan memungkinkan Anda memainkan game VR tanpa stres.
Yang mengatakan, sementara Anda memiliki berbagai PC game pra-built yang tersedia yang dapat Anda beli dari rak, mereka datang dengan label harga yang besar, sering membuat mereka di luar jangkauan untuk sebagian besar.
Artikel berlanjut setelah iklan
Artikel berlanjut setelah iklan
Jadi, jika Anda memiliki cukup kesabaran untuk merakit PC khusus, maka membangunnya sendiri adalah solusi yang sempurna. Meskipun diperingatkan, membangun PC game Anda lebih dari sekadar membeli dan menyusun beberapa komponen. Anda harus dengan cermat merencanakan dan mencari CPU, SSD, RAM, GPU, keyboard, dan banyak lagi terbaru dan terhebat. Plus, Anda perlu memastikan bahwa semua komponen yang Anda pilih kompatibel satu sama lain.
Jika Anda terbiasa dengan industri chipset, 2023 adalah waktu yang tepat untuk menghadapi tantangan teknologi ini. Dengan CPU Gen ke-13 Intel yang kuat memberikan kinerja bintang dan harga RAM mencapai posisi terendah sepanjang masa, Anda tidak bisa salah.
Artikel berlanjut setelah iklan
Artikel berlanjut setelah iklan
Sebelum menyelam, Anda perlu merencanakan pendekatan Anda dengan cermat. Jenis binatang macam apa yang ingin Anda bangun? Apakah Anda ingin menyeimbangkan kinerja dengan anggaran, atau tidak kompromi game 4K tujuan akhir Anda? Bergantung pada apa yang Anda inginkan, Anda mungkin perlu meningkatkan pendingin, GPU, dan komponen lainnya yang sesuai.
Setelah Anda menyelesaikan anggaran dan prioritas Anda, Anda dapat membangun PC Gaming Impian Anda.
Langkah 1: Pilih sebuah kasing
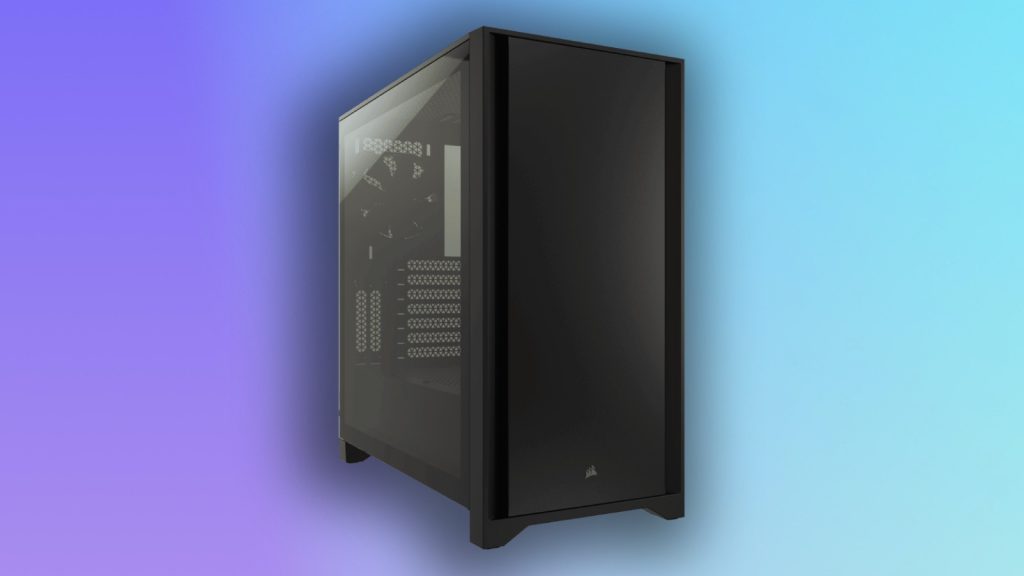
Sebelum memilih hal lain, pilih casing untuk sistem Anda. Ini akan menentukan ukuran PC Anda dan akan menentukan ukuran motherboard, kompatibilitas yang lebih dingin, dan aliran udara dalam sistem Anda. Faktor bentuk yang paling populer adalah kasus menara tengah seperti mesh Lian Li Lancool II. Beberapa kasus memiliki fitur premium yang mungkin Anda inginkan, seperti HAF 700 EVO yang lebih keren, tetapi ini dapat dikenakan biaya bom.
Artikel berlanjut setelah iklan
Terkait:
Top 10 NFT termahal yang pernah dijual
Jika Anda ingin membangun PC gaming kecil yang ringkas. Anda harus berharap untuk membayar sedikit lebih banyak untuk motherboard Anda, dan Anda mungkin harus kreatif dengan pilihan komponen Anda. Memilih Faktor Bentuk adalah langkah penting dalam cara membangun PC game. Jadi, pastikan untuk memilih dengan bijak.
Setelah Anda memilih kasus Anda, Anda dapat beralih ke memilih komponen.
Langkah 2: Pilih komponen Anda
Memilih komponen bisa sangat merepotkan. Jika Anda memilih Intel atau AMD CPU, pastikan Anda memilih motherboard yang tepat untuk pergi bersamanya. Ingat, memilih RTX 4090 untuk PC Anda akan sangat berarti jika CPU dan catu daya Anda tidak sesuai dengan tugas menjalankannya.
Artikel berlanjut setelah iklan
Artikel berlanjut setelah iklan
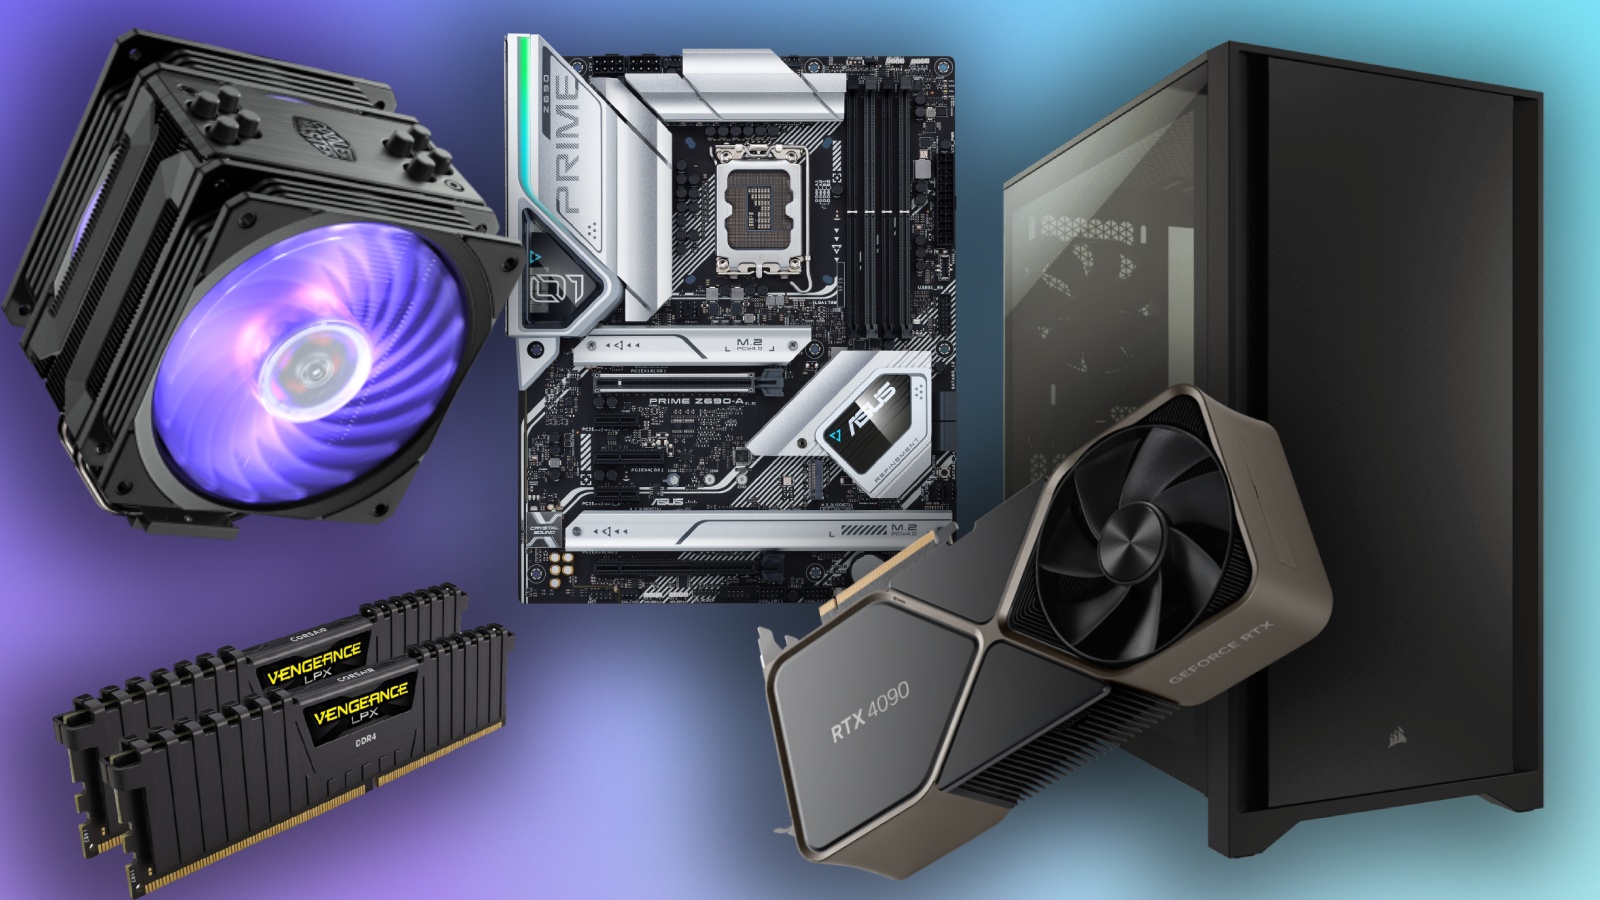
Buat daftar periksa komponen berikut:
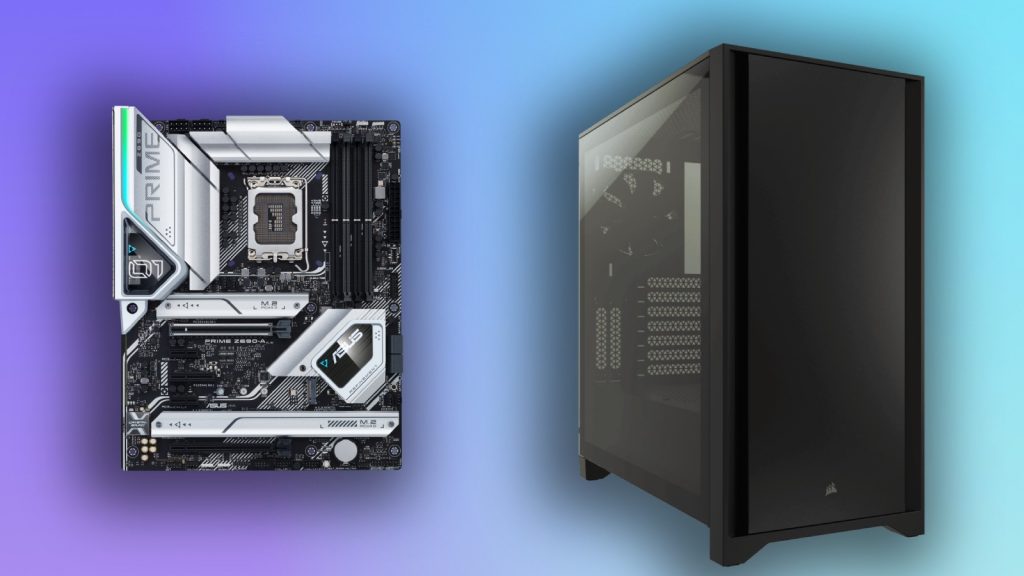
Area utama yang akan menentukan kinerja adalah CPU dan GPU Anda. Sementara motherboard Anda duduk sebagai jantung yang berdetak kencang, pastikan semuanya bekerja dengan benar. Beberapa motherboard dapat menawarkan fitur premium seperti lebih banyak slot memori, atau header USB-C mewah, jadi pastikan untuk memilih dengan bijak.
Anda juga harus mencari untuk mengambil PSU (catu daya) yang mampu menjalankan semua yang Anda lemparkan. Pastikan Anda mengambil PSU merek terkemuka, karena membaca komponen ini dapat benar -benar melemparkan Anda ke bawah bus, dan menyebabkan bagian lain gagal jika tidak sesuai dengan tugas.
Artikel berlanjut setelah iklan
Artikel berlanjut setelah iklan
Build yang Disarankan: Nilai $ 1000 Gaming PC
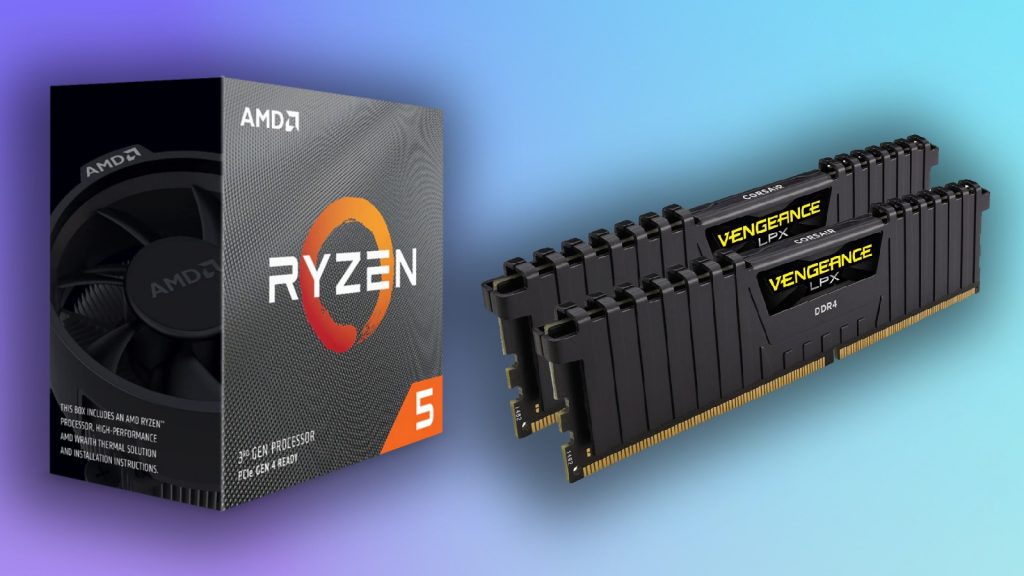
Kami telah memilih beberapa bagian sendiri, yang seharusnya membantu Anda membuat PC game Anda dengan harga sekitar $ 1000. Ini termasuk CPU generasi ke-13 Intel, dan AMD RX 6700, yang akan menjadi sistem yang cukup kuat.
- CPU: Intel Core i5-13600k
- GPU: AMD Radeon RX 6700 XT
- Motherboard: Gigabyte b660m ds3h*
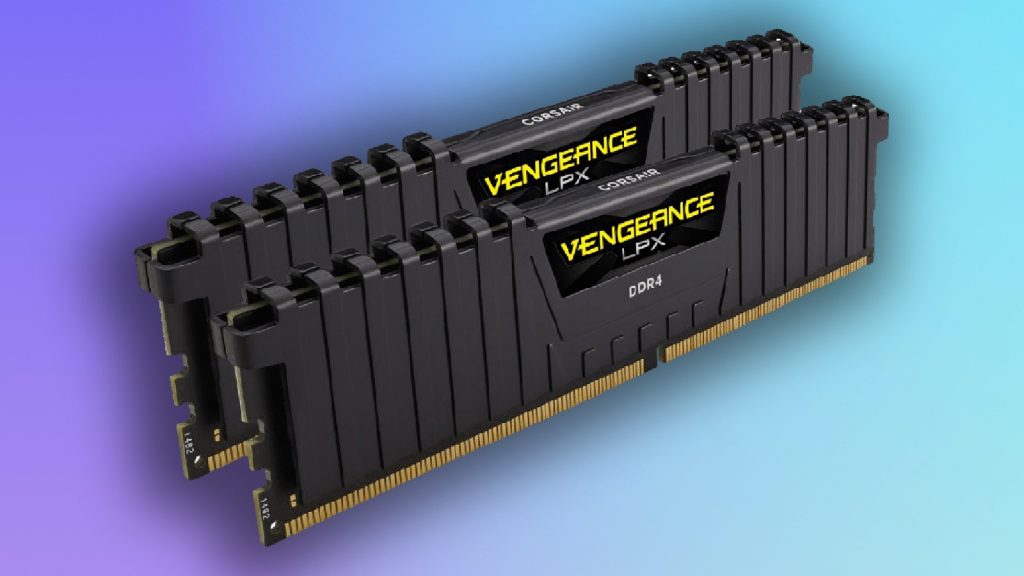
- Ram: Corsair LPX 16GB DDR4-3200
- Penyimpanan: Sabrent Rocket 4.0 1TB NVME SSD
- PSU: Thermaltake Toughpower GF1 650W Gold PSU
- CPU Cooler: Deepcool AK400
- Kasus:Aliran udara Corsair 4000D
* Papan B660 mungkin mengharuskan Anda untuk mem -flash BIOS agar Intel 13th Gen CPU berfungsi. Beberapa pengecer menawarkan layanan ini di titik pembelian. Anda juga dapat memilih kasing microatx yang lebih kecil dengan motherboard ini.
Artikel berlanjut setelah iklan
Langkah 3: Persiapkan Bangunan Anda
Jika Anda ingin memastikan bahwa bangunan Anda akan berjalan dengan lancar, kami sarankan Anda menyiapkan area kecil untuk bagian dan alat Anda. Pastikan Anda memiliki obeng yang bagus untuk diserahkan, karena Anda harus memanfaatkannya selama proses pembangunan.
Artikel berlanjut setelah iklan
Anda juga ingin membuat gambar OS yang dapat di -boot pada tongkat USB. Anda dapat mengambil satu untuk windows di sini. Pastikan untuk memilih media instalasi Windows 11.
Artikel berlanjut setelah iklan
Kemudian, pastikan semua bagian Anda tiba dengan selamat. Setelah semuanya tiba, dan Anda memiliki area pembangunan kecil yang disiapkan, Anda dapat memulai build pc game Anda dengan sungguh -sungguh.
Langkah 4: Memasang CPU
Pertama, keluarkan motherboard Anda dari kotaknya, dan letakkan di atas lembaran statis yang datang bersamanya. Kemudian, letakkan motherboard dan tas statis di atas kotak. Sekarang, kami ingin mulai menyiapkan motherboard.
Artikel berlanjut setelah iklan
Hal pertama yang ingin Anda lakukan adalah menempatkan CPU ke dalam motherboard. Motherboard modern menggunakan sistem LGA, yang merupakan tuas kecil yang melepaskan kait sehingga CPU dapat ditempatkan. Tarik dengan lembut menjauh dari soket untuk membukanya. Setelah dibatalkan, keluarkan CPU Anda dari kotak.
Artikel berlanjut setelah iklan
Apa yang Anda cari di sini adalah chip kecil dengan kontak emas di bawahnya. Pegang CPU di tepi, agar tidak mengganggu kontak emas. CPU sangat rapuh. Kemudian, Anda harus melihat panah di CPU Anda, berbaris dengan soket di motherboard, dan letakkan dengan lembut ke dalam soket.
Artikel berlanjut setelah iklan
Setelah masuk, Anda dapat sekali lagi menurunkan lapisan retensi, ini dapat membutuhkan kekuatan, tetapi Anda tidak melakukan kesalahan selama semuanya berbaris dengan benar.
Artikel berlanjut setelah iklan
Langkah 5: Memasang RAM Anda
Untuk slot di RAM Anda, pertama -tama Anda harus mengidentifikasi slot ram di motherboard Anda, ini adalah strip panjang, dengan kait di kedua ujungnya. Menggunakan manual motherboard Anda, identifikasi slot utama. Jika Anda memasang lebih dari satu batang RAM, pastikan Anda memilih slot yang tepat untuk menjalankannya dalam mode saluran ganda yang sedikit lebih cepat. Ini biasanya disimpulkan oleh penunjukan “A2 dan B2”. Kemudian, pastikan slotnya tidak ditambatkan.
Artikel berlanjut setelah iklan
Sekarang, unbox RAM Anda, dan identifikasi di mana takik kecil terletak di tongkat dan motherboard Anda. Kemudian, sesederhana memberikan tekanan sampai Anda mendengar klik kecil. Ini akan menandakan bahwa RAM ditempatkan dengan benar. Pastikan untuk memeriksa ulang bahwa kedua ujungnya duduk dengan benar pada setiap batang ram yang Anda pasang. Setelah mereka semua ditempatkan, Anda dapat pindah ke langkah berikutnya.
Artikel berlanjut setelah iklan
Langkah 6: Memasang M.2 NVME SSD
Sebagian besar sistem modern sekarang menggunakan m.2 nvme ssd drive, yang terlihat seperti tongkat kecil permen karet. Harus ada port di motherboard Anda untuk menginstal ini. Setelah Anda mengidentifikasinya, pastikan Anda memiliki salah satu sekrup kecil yang mungkin telah Anda sertakan dalam kotak untuk motherboard Anda. Lalu slot m.2 NVME SSD ke dalam sistem Anda. Itu harus menopang dirinya sendiri pada suatu sudut, jika dilakukan dengan benar. Kemudian, tekan dengan lembut sampai sejajar dengan lubang sekrup di motherboard Anda, dan dengan aman mengacaukannya.
Daftar ke Dexerto secara gratis dan terima
Lebih sedikit iklan | Mode Gelap | Penawaran dalam permainan, TV dan film, dan teknologi
Artikel berlanjut setelah iklan
Langkah 7: Pasang pendingin CPU Anda (udara)
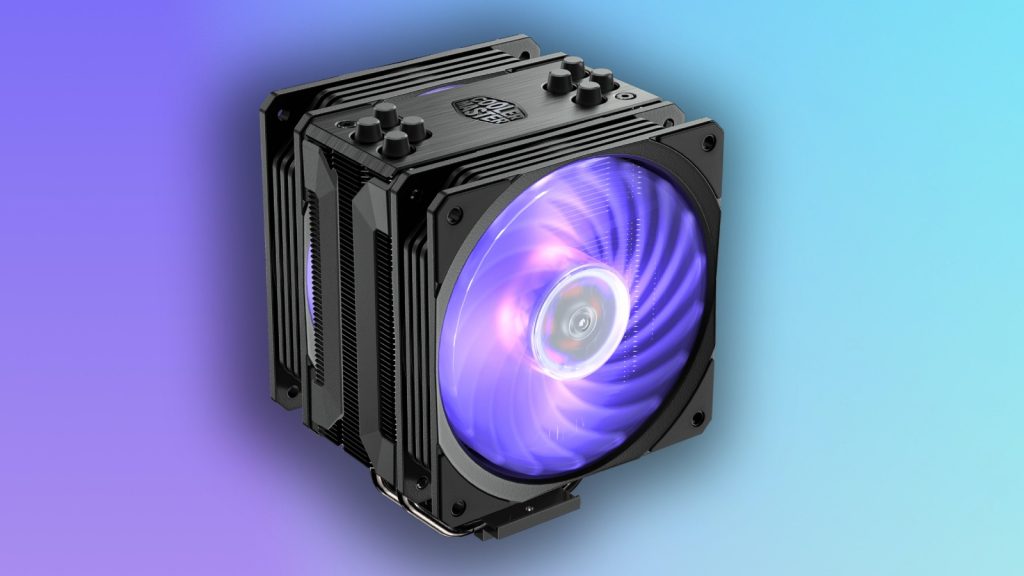
Sekarang, jika Anda telah memilih pendingin udara untuk sistem Anda, ini adalah tempat terbaik untuk menginstalnya. Jika Anda menggunakan pendingin aftermarket. Pastikan Anda mengikuti instruksi yang disediakan untuk menginstalnya ke dalam sistem Anda. Jika Anda menggunakan pendingin air AIO, Anda harus menunggu sampai sedikit kemudian untuk melakukan langkah ini. Jangan lupa pasta termal Anda. Pastikan untuk menghubungkan penggemar Anda saat melakukan ini juga.
Artikel berlanjut setelah iklan
Kami menyarankan Anda menggunakan gumpalan berukuran untuk sebutir beras di tengah CPU untuk cakupan yang baik.
Langkah 8: Tempatkan motherboard Anda ke dalam kasing
Sekarang semua motherboard Anda sudah disiapkan, Anda ingin membuka kotak kasing Anda dan meletakkannya rata. Jika motherboard Anda memiliki perisai IO yang terpisah, maka Anda akan ingin menempatkan ini sekarang. Jika tidak, Anda dapat mengabaikannya dengan aman untuk saat ini.
Artikel berlanjut setelah iklan
Banyak kasus datang dengan standoff yang diinstal sebelumnya. Namun, jika kasus yang Anda pilih tidak memiliki ini, tempatkan mereka selaras dengan lubang. Kemudian, sejajarkan standoff dengan motherboard Anda. Setelah sepenuhnya selaras, mulailah untuk mengacaukan motherboard ke standoff. Ini harus selaras dengan lubang di motherboard Anda juga. Pastikan untuk mengacaukan ujung yang berlawanan terlebih dahulu, untuk menyelaraskan motherboard di tempatnya dengan aman. Lanjutkan ini sampai Anda dengan aman mengikat motherboard ke kasus Anda.
Artikel berlanjut setelah iklan
Kemudian, Anda akan ingin menghubungkan kabel IO depan Anda, ini mungkin memerlukan satu atau dua header USB, di samping pin panel depan kecil. Konsultasikan dengan manual motherboard Anda untuk memahami di mana ini, dan pin apa yang dibutuhkan di mana.
Artikel berlanjut setelah iklan
Langkah 9: Siapkan catu daya Anda
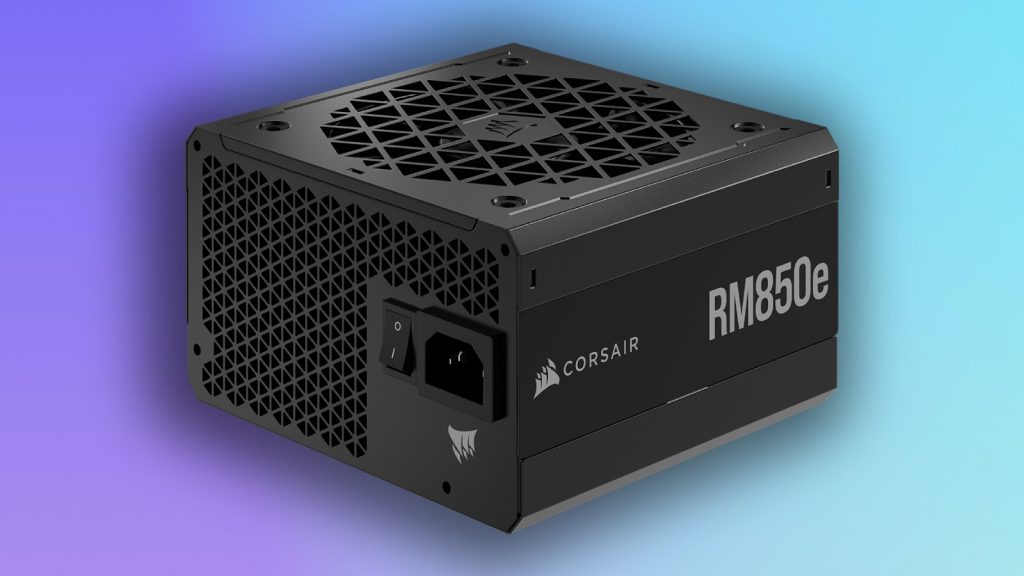
Selanjutnya, Anda harus membuka kotak catu daya Anda. Jika Anda memiliki catu daya modular, Anda ingin memastikan Anda memiliki motherboard, CPU, dan kabel GPU terpasang. Kemudian, masukkan catu daya ke dalam sistem Anda. Sekarang, dengan hati -hati mengarahkan kabel ke posisi yang dimaksudkan. Kabel motherboard 24-pin Anda harus ditempatkan di sebelah kanan motherboard, konektor CPU di kiri atas, dan kabel GPU dialihkan ke bagian bawah.
Artikel berlanjut setelah iklan
Kemudian, sambungkan kabel PSU untuk motherboard dan CPU Anda ke sistem Anda.
Langkah 10: Instal CPU Cooler Anda (AIO)
Jika Anda memiliki pendingin air all-in-one untuk CPU Anda, inilah saatnya Anda harus menginstalnya. Pertama, kami sarankan menginstal kipas dan radiator ke dalam kasus Anda. Ini bisa di beberapa posisi. Kemudian dengan cermat ikuti manual AIO Anda untuk memahami bagaimana para penggemar selaras dengan AIO dalam kasus Anda.
Artikel berlanjut setelah iklan
Lalu, Anda ingin menempatkan kurung apa pun di motherboard Anda. Kemudian, gunakan beberapa pasta termal di atas CPU Anda. Kami merekomendasikan gumpalan seukuran butiran nasi. Kemudian, masukkan aio ke CPU Anda dan kencangkan dengan aman.
Artikel berlanjut setelah iklan
Anda ingin meluangkan waktu di sini untuk memastikan bahwa semua kabel yang diperlukan dicolokkan ke motherboard Anda, ini mungkin termasuk header kipas, header USB, atau daya SATA. Jika Anda membutuhkan daya sata, cukup pasang kabel SATA ke PSU Anda dan kaitkan semuanya. Jika Anda tidak yakin di mana harus menempatkan atau mengidentifikasi header motherboard apa pun, konsultasikan dengan manual.
Artikel berlanjut setelah iklan
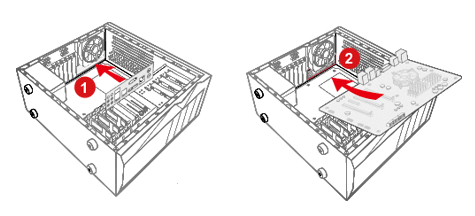
Langkah 11: Instal GPU Anda
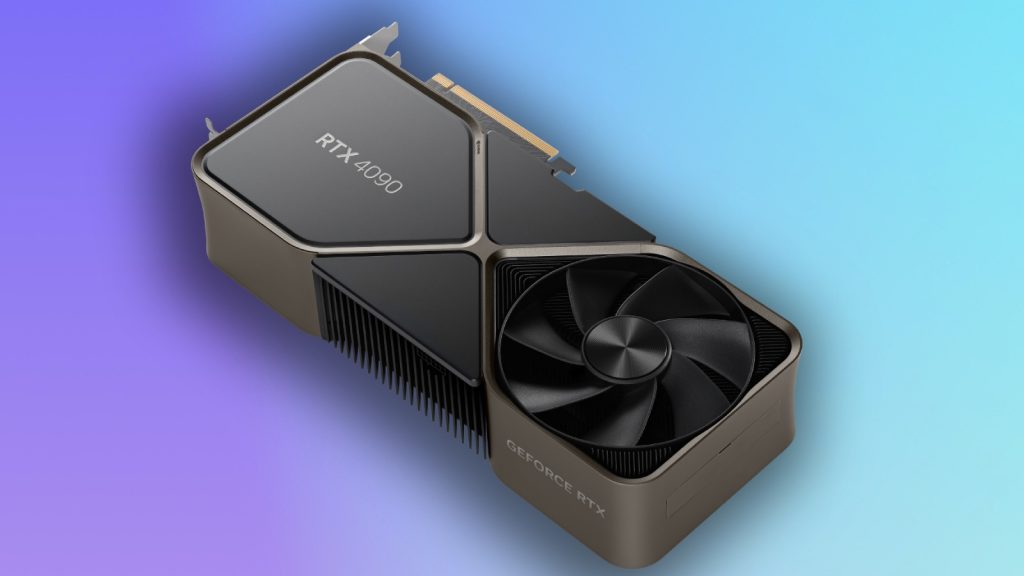
Untuk menginstal GPU Anda, pastikan tidak ada penghalang pada kasus Anda. Ini mungkin termasuk beberapa tanda kurung di bagian belakang yang perlu dihapus. Tergantung pada ukuran kartu grafis Anda, ini bisa di mana saja antara dua hingga empat slot.
Artikel berlanjut setelah iklan
Kemudian, selaras konektor PCIe di GPU Anda dengan takik di motherboard Anda. Dorong sampai Anda mendengar klik yang memuaskan. Jika tidak berfungsi, pastikan Anda sejajar dengan soket.
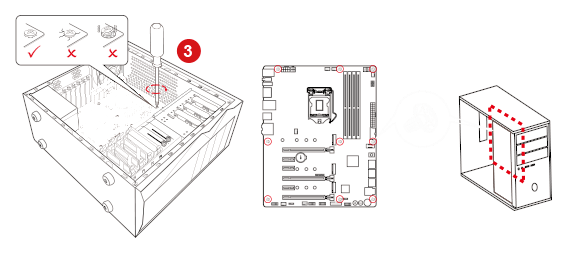
Setelah GPU diklik pada tempatnya, Anda ingin mengacaukan braket untuk slot. Layak mendorong GPU Anda sedikit sambil mengikat ini, karena Anda dapat mencapai GPU Sag minimal untuk melakukannya.
Artikel berlanjut setelah iklan
Setelah semuanya kacau, kaitkan kabel PSU yang kami rute lebih awal dan pasang ke GPU Anda. Jika Anda memiliki GPU yang menggunakan konektor 12VHPWR baru NVIDIA, pastikan Anda pergi sekitar 3.5mm ruang sebelum menekuknya.
Artikel berlanjut setelah iklan
Langkah 12: Pasang penggemar atau aksesori tambahan
Jika Anda ingin menginstal kipas ekstra, ini adalah kesempatan Anda, cari header di PC Anda untuk menghubungkan semuanya. Jika Anda memiliki header argb, pastikan Anda menggunakan header yang benar, karena memasukkannya ke yang salah, seseorang dapat menyebabkan kebaikan RGB Anda pendek.
Langkah 13: Test Boot
Hubungkan kabel daya, dan aktifkan PSU Anda, selanjutnya, kaitkan port tampilan GPU Anda ke monitor Anda. . Jika Anda telah melakukan ini dengan benar, maka PC Anda harus hidup, dan Anda akan disambut dengan layar BIOS. Jika Anda telah mencapai titik ini, Anda sekarang dapat menginstal OS seperti Windows jika Anda menghubungkan keyboard.
Artikel berlanjut setelah iklan
Artikel berlanjut setelah iklan
Jika tidak dihidupkan, ganti langkah Anda ke pinout motherboard untuk tombol power. Jika berjalan, tetapi Anda tidak memposting, Anda mungkin perlu melihat masalah perangkat keras. Beberapa motherboard memiliki LED atau kode yang berkedip yang menunjukkan apa yang salah. Gagal itu. Menelusuri kembali dan mengulangi semua langkah Anda. Jika masih tidak berhasil, maka Anda mungkin menghadapi masalah listrik.
Langkah 14: Instal Windows & Driver
Selanjutnya, menggunakan drive windows yang dapat di -boot Anda, instal OS. Ini cukup jelas. Kemudian, begitu Anda berada di Windows, pastikan Anda menginstal perangkat lunak apa pun yang terkait dengan driver GPU Anda. Kemudian kontrol kipas atau perangkat lunak RGB juga akan berguna, tergantung pada apa yang telah Anda beli.
Artikel berlanjut setelah iklan
Artikel berlanjut setelah iklan
Langkah 15: Nikmati
Bagus, Anda baru saja membuat PC game. Sekarang, Anda dapat memuat PC Anda dengan semua barang game yang Anda inginkan. PC game dapat ditingkatkan, jadi jika Anda membutuhkan lebih banyak penyimpanan, Anda harus dapat menambahkan lebih banyak. Ini juga berlaku untuk menginstal kartu grafis baru, atau elemen lain dari sistem. Karena Anda telah melakukannya sendiri, Anda memiliki manfaat tambahan karena dapat memahami apa yang membuat PC Anda juga tergerak.
Mudah -mudahan, menggunakan panduan ini, Anda telah belajar sendiri cara membangun PC game.
Artikel berlanjut setelah iklan
Berapa biaya pc gaming?
Anda dapat membangun PC game dari mana saja dari sekitar $ 600. Kami tidak akan merekomendasikan membangun satu di bawah titik itu. Jika Anda kekurangan uang tunai, dek uap mungkin menjadi alternatif anggaran terbaik Anda.
Artikel berlanjut setelah iklan
Setelah Anda memutuskan untuk apa Anda menggunakan PC Anda, Anda dapat mulai merencanakan anggaran yang kasar. Dengan estimasi kami, membangun PC game yang mampu yang dapat mendorong framerate 1440p akan berharga sekitar $ 1000.
Juga, pastikan untuk memeriksa pemandu kami yang lain:
Artikel berlanjut setelah iklan
Jika Anda mengklik tautan produk di halaman ini, kami dapat memperoleh komisi afiliasi kecil.
Panduan Pembuatan PC yang lengkap untuk pemula

Meskipun membangun PC semudah menyusun set Lego, Anda harus tahu tentang blok bangunan sebelum memulai. PC Builds dapat memiliki banyak gaya dan kegunaan, tetapi beberapa komponen bersifat mendasar dan harus menjadi bagian dari setiap PC.
Mari kita pelajari dasar -dasar setiap bagian, haruskah kita?
Ebook gratis!
Pernah ingin membangun PC Anda sendiri?
Ambil salinan offline untuk membuat PC Anda lebih mudah!
Cara Membangun PC
Panduan Membangun Langkah-demi-Langkah dalam 10 Langkah
Saatnya membuat tangan Anda kotor! Dengan instruksi pembangunan PC langsung, bahkan pengatur waktu pertama dapat membangun PC yang cantik dan berkinerja tinggi. Ambil obeng, ke atas gairah itu, dan Anda baik untuk pergi!
Sebelum mulai, beberapa hal sederhana yang harus disiapkan:
- Obeng magnetik.
- Ikatan zip /strip velcro dan gunting sepasang.
- Permukaan non -konduktif yang bersih untuk membangun PC Anda
- !
Pin di motherboard rentan, jadi berhati -hatilah untuk tidak menekuknya.

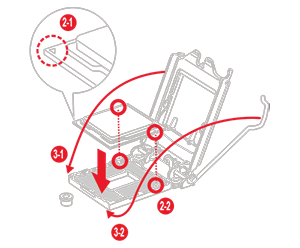
- Bersihkan tutup soket CPU
- Bariskan takik yang dicetak pada CPU dengan takik penuntun yang ditandai di soket; masukkan dengan hati -hati di dalam soket.
- Pastikan CPU ditempatkan dengan benar kemudian periksa kembali tutupnya dan kunci ke prosesor.
Hati -hati dengan pin soket CPU (atau pin CPU), karena terbuat dari non modular, yang merupakan bahan lunak. Mereka sangat rapuh, setiap tabrakan kecil dapat menekuk pin, yang dapat menyebabkan kesalahan fungsional.
- Menekan tab kunci/ejector yang terletak di ujung soket memori.
- Periksa urutan pemasangan modul memori yang diuraikan dalam manual motherboard, dan pastikan slot memori yang cocok untuk dimasukkan terlebih dahulu.
- Dorong modul ke bawah sampai Anda mendengar “klik” karena klip retensi didorong ke atas dan mengunci modul.
Urutan yang disarankan dari slot memori mana yang akan dipasang terlebih dahulu mungkin berbeda karena motherboard yang berbeda. Ambil motherboard MSI sebagai contoh, Anda disarankan untuk memasukkan kit memori ke dalam slot DIMM1 terlebih dahulu.
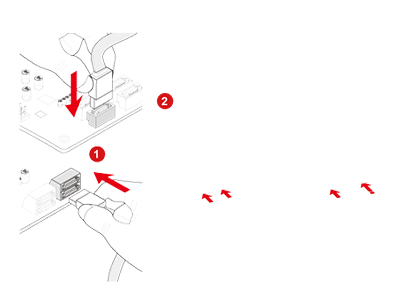
- Pindahkan dan kencangkan sekrup riser di m.2 standoff.
- Ambil drive Anda dan masukkan dengan lembut ke konektor pada sudut 45 derajat.
- Dorong ke bawah menuju standoff dan mengamankannya dengan sekrup kecil.
Beberapa motherboard kelas atas datang dengan solusi pendingin khusus untuk m.2, seperti m.2 perisai dan m.2 Forzr. Anda dapat merujuk ke manual motherboard untuk langkah instalasi tambahan.
- Pasang piring belakang ke bagian belakang motherboard. (Jika Anda memilikinya)
- Oleskan setetes pasta termal ke permukaan prosesor.
- Hubungkan kabel kipas CPU ke header kipas CPU di motherboard.
- Turunkan pendingin secara vertikal dan letakkan di CPU. Mengamankannya secara merata mengencangkan sekrup yang berlawanan secara progresif.
Pastikan Anda menerapkan pasta termal dengan jumlah yang tepat. Terlalu sedikit atau terlalu banyak yang akan menyebabkan kontak yang buruk atau mendapatkan pasta ke soket secara relatif.
Pastikan sekrup dikencangkan dengan benar, dan tekanan yang diterapkan di sudut -sudut bahkan untuk menghindari kerusakan CPU dan degradasi kinerja pendinginan.

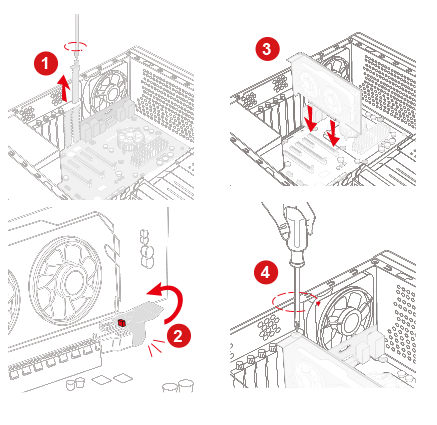
- Pasang perisai I/O ke bagian belakang kasing.
- Ambil motherboard Anda dan turunkan dengan lembut pada sudut 45 derajat ke dalam kasing.
- Cocokkan lubang pemasangan di motherboard dengan stand-off dalam case.
- Amankan papan dengan masing -masing sekrup yang disediakan.
Jangan tinggalkan sekrup – dudukan padat akan sangat membantu untuk mengamankan motherboard di tempat untuk menghindari gerakan yang tidak stabil.
- Hubungkan salah satu ujung kabel SATA ke port SATA di motherboard, dan ujung lainnya ke perangkat penyimpanan (2.5 ‘inci / 3.5 ‘inci) itu sendiri.
Pastikan Anda memasang hard drive ketat untuk menghindari kerusakan.
- Hapus braket PCI-E belakang dari casing.
- Buka kunci slot PCI-E dengan mendorong kembali kunci plastik kecil yang terletak di bagian belakang slot.
- Pegang kartu dengan dua tangan, turunkan kartu grafis ke dalam casing dan pasang ke slot PCI-E motherboard.
- Amankan kartu grafis dengan sekrup yang diperlukan ke bagian belakang sasis.
Beberapa kartu kelas atas lebih panjang atau menggunakan lebih banyak ruang PCI. Pastikan untuk memeriksanya sebelumnya untuk memilih kasus yang sesuai yang dapat sesuai dengan kartu grafis.
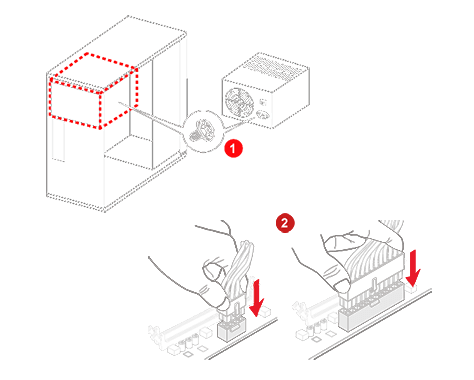
- Pasang catu daya (PSU) ke sasis dan kencangkan dengan semua sekrup.
- Hubungkan konektor daya 24-pin ke soket di motherboard
- Hubungkan konektor daya CPU 8-pin ke motherboard.
- Hubungkan 6+2 Pin PCI-E Cable ke Kartu Grafis (dapat bervariasi berdasarkan produk kartu grafis)
- Klip di SATA Power Connecter Anda ke Hard Drive
- Hubungkan konektor Molex lainnya (dengan 4 pin horizontal) ke perangkat tambahan (e.G. Drive optik DVD/CD).
Memilih watt yang sesuai untuk catu daya sangat penting. Anda dapat menggunakan simulator build pc online seperti PC Part Picker atau MSI Power Supply Calculator Tool untuk mendapatkan estimasi daya yang dibutuhkan oleh build Anda. .
- .
- Hubungkan kabel USB depan ke header pin USB di motherboard
- USB 3.0 / USB 2.0 Kabel ke USB 3.0 / USB 2.0 header pin.
- Kabel USB Type-C depan ke header pin USBTYPE-C depan
- Hubungkan kabel audio (speaker) ke motherboard jaud1 pin header.
Periksa jumlah maksimum port USB di motherboard sebelum membeli casing PC. Pastikan kasus yang ingin Anda beli juga mendukung port USB yang cukup seperti motherboard.
- Siapkan 8 gigabyte atau lebih USB3 Thumb Drive
- Di komputer dengan internet, cari “Windows 10 Media Tool *”, unduh 10 instalasi dan jalankan, dan pilih untuk membuat gambar di USB, program akan memformat, atau menghapus, drive
- Colokkan USB instalasi di port USB belakang motherboard, pilih port USB3 merah cepat atau USB3 normal dengan insert biru. Nyalakan komputer, biasanya boot pertama yang akan dimuat BIOS, Anda dapat menyimpan dan keluar, memulai kembali PC. USB harus memuat dan Anda dapat melanjutkan dengan instalasi.
* Tergantung versi terbaru/disarankan yang ingin Anda instal
- Masukkan perangkat OS (CD / USB)
- Ikuti langkah -langkah instalasi OS
- Unduh driver perangkat terbaru dari situs web dan instal.
Periksa jumlah maksimum port USB di motherboard sebelum membeli casing PC. Pastikan kasus yang ingin Anda beli juga mendukung port USB yang cukup seperti motherboard.
Bagaimana membangun PC terbaik untuk kebutuhan saya?
Apakah Anda memerlukan PC untuk bermain game yang intens atau produksi multimedia yang berat? Berikut adalah beberapa tips yang perlu Anda pertimbangkan saat memilih bagian Anda.
Tambahkan beberapa RGB ke PC Anda
Alat yang berguna untuk merencanakan bagian PC Anda
- Rencanakan daftar build Anda pcpartpicker
- Pilih Kalkulator Catu Daya MSI PSU yang Tepat
Rencanakan daftar build Anda: pcpartpicker
Rencanakan daftar build Anda: pcpartpicker

Bagian terpenting dari membangun PC bukanlah “bangunan” itu sendiri; itu membuat daftar bagian yang selaras dengan kebutuhan Anda. Lagipula, apa yang secara signifikan mempengaruhi kinerja PC Anda adalah perangkat kerasnya. Untuk membantu Anda menyesuaikan daftar build Anda sendiri, kami sarankan menggunakan sumber daya yang bermanfaat seperti PCPartPicker (https: // pcpartpicker.com/)
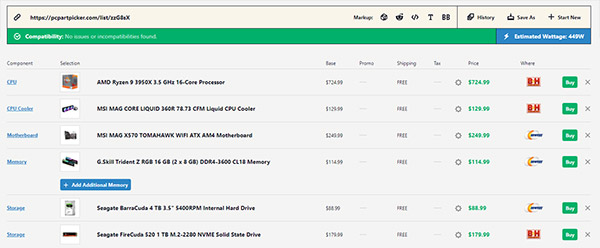
PCPartPicker menawarkan informasi produk yang sangat terperinci, termasuk ulasan pengguna, dan bahkan menawarkan tautan untuk membeli produk tersebut. Dengan mengalihkan situs web ke daerah yang berbeda, tautan beli akan terhubung ke situs web e-tailer lokal. Ini tidak hanya menyediakan berbagai pilihan produk yang tersedia, tetapi juga memberi Anda referensi harga dan tempat untuk membelinya – membantu Anda menghemat waktu dan uang.
Ketika Anda selesai membuat daftar build ideal Anda, ada beberapa fungsi yang dapat Anda manfaatkan:
Menyimpan. Cukup simpan daftar build yang direncanakan terlebih dahulu jika Anda belum memutuskan untuk membeli rig Anda saat ini. Luangkan waktu Anda untuk membandingkan dan mempertimbangkan.
Membagikan. Anda dapat berbagi daftar build dengan teman atau ke forum untuk lebih banyak pendapat tentang Anda build pc.
Membeli. Tombol mudah bagi Anda untuk membeli produk di situs e-tailer dengan mudah.
Pilih PSU yang tepat: Kalkulator Catu Daya MSI
Pilih PSU yang tepat untuk Anda: Kalkulator Catu Daya MSI
Satu pertanyaan besar yang dihadapi banyak pembangun saat membeli komponen adalah bahwa “Berapa banyak watt yang saya butuhkan di PSU saya untuk membuat PC saya berfungsi?”Jangan meremehkan masalah ini, untuk membeli PSU dengan watt yang tidak cocok dapat memengaruhi peningkatan PC Anda di masa depan. Jika Anda membeli PSU dengan catu daya yang tidak mencukupi, itu mungkin tidak memiliki kabel output yang cukup untuk komponen lain seperti GPU. Juga, komputer Anda mungkin mengalami cegukan dan sistem macet dari waktu ke waktu. Untuk beberapa kasus, mungkin menyebabkan . Kalkulator Catu Daya MSI (https: // www.MSI..
Lihat di sini: https: // www.MSI.COM/POWER-Supply-Calculator
Isi konfigurasi Anda
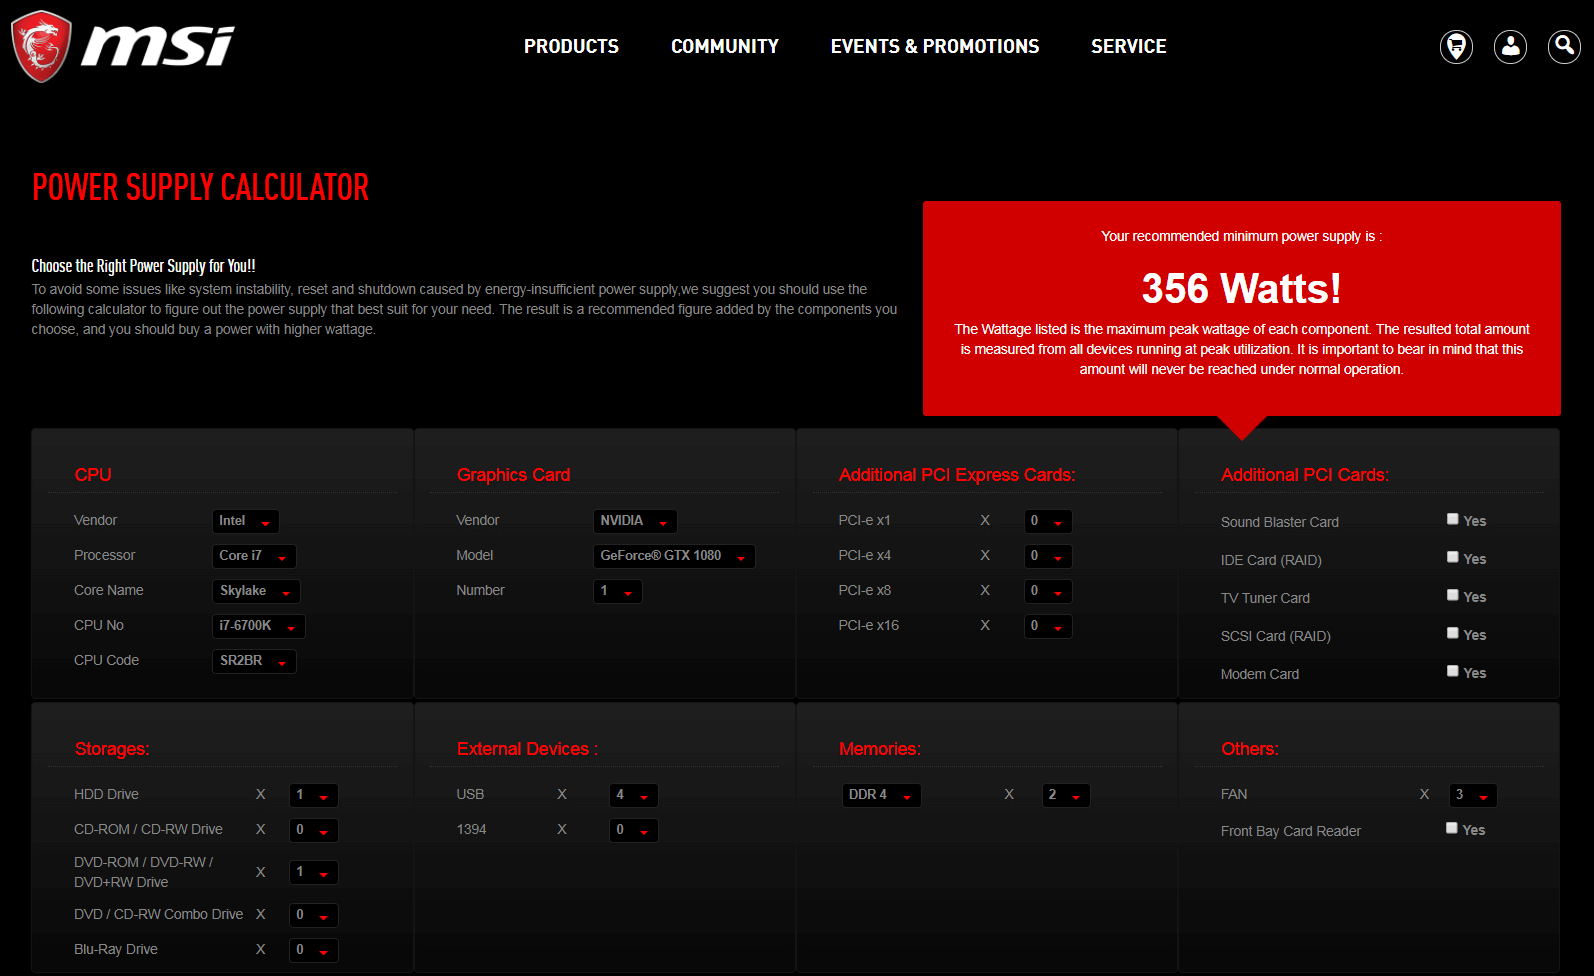
Dengan mengisi konfigurasi PC Anda, Kalkulator Catu Daya MSI (https: // www.MSI.com/power-supply-calculator) akan secara otomatis menghitung watt yang dibutuhkan PC Anda untuk menjalankan sistem secara stabil. Pengguna hanya dapat membeli PSU yang sesuai.
FAQ
Ingin menemukan jawaban cepat?
Ketika Anda mulai memahami cara kerja pembangunan PC, harus ada banyak pertanyaan. Anda tidak sendirian, kami telah mencantumkan beberapa pertanyaan yang umum diajukan dan diatur ke dalam beberapa kategori.
CPU adalah otak komputer, terutama bertanggung jawab untuk menafsirkan instruksi komputer dan memproses data dalam perangkat lunak komputer.
Pendingin CPU dikompilasi kipas dan heatsink agar CPU tetap dingin dan mencegah CPU terlalu panas yang dapat menyebabkan sistem dimatikan untuk melindungi komponen penting.
Motherboard adalah platform yang menyimpan semua komponen di komputer. Ini menghubungkan berbagai komponen komputer serta menangani komunikasi dan transmisi antara komponen -komponen ini.
RAM digunakan untuk menyimpan data sementara, meningkatkan kecepatan di mana CPU dapat mengakses data dari hard drive. Kapasitas memori dan frekuensi mempengaruhi kinerja komputer.
?
Kartu grafis mengambil data dari komputer dan mengeluarkannya sebagai teks, gambar, dan warna pada monitor tampilan.
Apa perbedaan antara HDD dan SSD?
HDD dan SSD keduanya perangkat penyimpanan di komputer.
Hard Disk Drive (HDD): Murah dan menawarkan kapasitas penyimpanan yang lebih tinggi, tetapi ukurannya relatif lambat dan besar
Solid State Drive (SSD): kapasitas lebih rendah, ukuran sedang, harga lebih tinggi tetapi kecepatan lebih cepat.
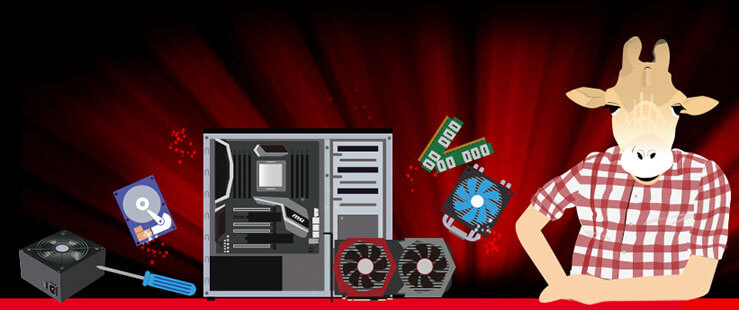
Apa yang saya butuhkan untuk membangun komputer game?
- CPU
- Motherboard
- Kartu grafik
- CPU Cooler
- Penyimpanan
- Perangkat penyimpanan (HHD atau SSD)
- Sumber Daya listrik
- Kasus
- Periferal (keyboard, mouse, headset)
- Monitor
What’s USB 3.2 Gen 1, USB 3.2 Gen 2 dan USB 3.2 Gen 2×2?
Organisasi USB-IF mengumumkan bahwa USB 3.2 Konektor yang mampu hingga 5Gbps sekarang akan diklasifikasikan sebagai USB 3.2 Gen 1. Sedangkan USB 3 yang baru.2 Konektor, mampu hingga 10Gbps (SuperSpeed+) sekarang akan diklasifikasikan sebagai USB 3.2 Gen 2. USB 3.2 Gen 2×2 mampu hingga 20 Gbps, dan hanya mendukung konektor Type-C.
Untuk detailnya, Anda dapat mengunjungi: https: // www.MSI.com/blog/new-USB-standard-USB-3-2-Gen-1-Gen2-Explained
Berapa banyak watt yang saya butuhkan di PSU saya untuk membuat PC saya berfungsi?
Watt yang Anda butuhkan tergantung pada konfigurasi PC Anda, Anda dapat memeriksa https: // wwww.MSI.com/ power-pasokan-kalkulator/ untuk memperkirakan watt PC Anda harus memilih PSU yang tepat.
Cara Memilih Pendingin CPU?
- Pilih pendingin CPU dengan kurung yang sesuai yang mendukung soket di motherboard.
- Setiap pendingin CPU mendukung daya desain termal yang berbeda (TDP), menunjukkan kisaran output panas atas yang dapat ditangani. CPU yang lebih kuat membutuhkan pendingin yang lebih baik untuk memastikan operasi yang stabil.
- Pilih pendingin yang sesuai dengan casing Anda. Pendingin yang kuat sering memiliki heat sink besar, jadi penting untuk memilih pendingin yang dapat masuk ke dalam kasing Anda tanpa menghalangi komponen lain.
Bagaimana memilih kasing pc?
- Apa faktor bentuk motherboard Anda, EATX, ATX, MatX atau Mini-ITX?
- Perangkat keras apa yang ingin Anda instal?
- Sistem pendingin jenis apa yang ingin Anda gunakan?
- Apakah Anda ingin menyesuaikan pencahayaan RGB dan muncul?
How-to PC membangun dukungan teknis
Cara membangun pc langkah demi langkah?
- Langkah 0: Persiapan
- Langkah 1: Instalasi CPU
- Langkah 2: Instalasi Memori
- Langkah 3: M.2 Instalasi
- Langkah 4: Instalasi Pendingin CPU
- Langkah 5: Instalasi Motherboard
- Langkah 6: Instalasi Penyimpanan
- Langkah 7: Instalasi Kartu Grafis
- Langkah 8: Instalasi Catu Daya
- Langkah 9: Koneksi panel depan dan manajemen kabel
- Langkah 10: Instalasi Sistem Operasi
Cara Menginstal/Mengubah RAM?
- Tekan tab ejector yang terletak di ujung soket memori.
- Periksa urutan pemasangan modul memori yang diuraikan dalam manual motherboard, dan pastikan slot memori yang cocok untuk dimasukkan terlebih dahulu.
- Dorong modul ke bawah sampai Anda mendengar “klik” karena klip retensi didorong ke atas dan mengunci modul.
Cara menginstal perangkat RGB?
- Periksa definisi header pin pada aksesori RGB yang dibeli dan motherboard (misalnya, 12V/5V)
- Colokkan konektor RGB 4-pin (3-pin) ke header RGB di motherboard
- Colokkan konektor daya tambahan saat menghubungkan aksesori RGB jika perlu
- Untuk penggemar, sambungkan ke konektor kipas di motherboard
- Untuk produk non-fan, sambungkan ke konektor 4-pin dari catu daya
Untuk detailnya, Anda dapat mengunjungi: https: // www.MSI.com/landing/mystic-light-rgb-gaming-pc/mystic-light
CPU, unit pemrosesan pusat. Tugasnya adalah menjalankan instruksi untuk perangkat lunak yang berjalan di komputer Anda. Merek utama untuk CPU adalah Intel dan AMD, dan memilih satu turun ke mana yang sesuai dengan kebutuhan dan anggaran Anda. Produk intel dan AMD tidak dapat dipertukarkan, karena mereka menggunakan soket yang berbeda untuk terhubung dengan motherboard.
Intel menggunakan LGA, dan soket berisi pin, membuat penanganan CPU lebih mudah tetapi membutuhkan perawatan saat memasang CPU di soket. AMD menggunakan kedua PGA, dengan pin pada CPU, dan LGA untuk CPU Threadripper kelas atas. CPU entry-level memiliki jumlah inti yang lebih rendah, dengan kemampuan pemrosesan dan multitasking yang lebih rendah. Prosesor kelas atas seperti Intel’s Cascade Lake atau CPU EPYC Server AMD dilengkapi dengan jumlah inti tinggi, dan fitur seperti keamanan, virtualisasi, atau sejumlah besar cache memori.
Yang penting bagi konsumen adalah jumlah inti dan utas. Semua CPU memiliki inti, tetapi CPU baru -baru ini membagi setiap inti menjadi dua core virtual yang disebut utas, menambahkan hingga 30% kinerja tambahan. Lebih banyak core membuat lebih banyak aplikasi berjalan dengan lancar pada sistem Anda secara bersamaan. Jadi jika Anda streaming di Twitch menggunakan perangkat lunak penyiaran saat bermain game, Anda akan memerlukan CPU dengan lebih banyak inti dan utas.
CPU menghasilkan banyak panas. Suhu tinggi dapat menyebabkan sistem dimatikan untuk melindungi komponen penting, dan bahkan dapat menyebabkan kerusakan permanen. Oleh karena itu, kipas dan heatsink diperlukan agar CPU tetap dingin. Kecuali untuk beberapa CPU kelas atas, sebagian besar CPU kotak dibundel dengan pendingin CPU yang sesuai yang dapat memenuhi permintaan dasar untuk disipasi panas.Untuk kinerja sistem yang lebih baik, disarankan untuk membeli pendingin CPU yang lebih baik.
. Pendingin udara dapat diklasifikasikan lebih lanjut menjadi pendingin gaya menara, downdraft dan updraft, tergantung pada penampilan dan arah aliran udara mereka. Pengguna harus memilih pendingin yang sesuai dengan produk dan keadaan mereka.


Saat memilih pendingin CPU, pertimbangkan pertimbangan berikut:
- Pendingin perlu menyediakan kurung yang sesuai, karena penentuan posisi braket dapat sedikit bervariasi tergantung pada soket di motherboard.

Motherboard, juga disebut mainboard, menghubungkan semua komponen komputer Anda, menghubungkan prosesor Anda, modul memori, grafik dan kartu ekspansi, hard drive, dan koneksi untuk jaringan Anda, keyboard, mouse, dan banyak lagi.
Dimensi motherboard
Sama seperti pakaian, motherboard datang dalam ukuran yang berbeda. Ukuran umum meliputi: ATX (30.5cm x 24.4cm) 、 Micro-ATX (24.4 cm x 24.4 cm) dan mini-itx (17 cm x 17 cm), tiga jenis dimensi motherboard.


Untuk CPU yang diberikan, sering ada pilihan chipset yang mendukungnya. Chipset menyediakan opsi dan konektivitas di motherboard, dan chipset dengan harga lebih tinggi menawarkan lebih banyak fitur. Ada banyak chipset yang berbeda, jadi untuk menyederhanakan, semakin tinggi nomor chipset, semakin banyak fungsionalitas motherboard Anda.
Intel dan AMD CPU memiliki chipset sendiri, jadi ketika Anda menemukan kecocokan, Anda dapat mencari untuk menemukan semua opsi yang berbeda. Misalnya, CPU Gen ke -12 Intel bekerja dengan chipset H610, B660, H670 dan Z690. Z690 dapat mendukung overclocking CPU dan memori, sementara B660 dapat mendukung overclocking memori. Untuk AMD, Ryzen CPU kelas atas harus mendapatkan chipset B550 atau X570. Anda dapat memasangkan mid atau entry level dengan B550, atau chipset X470 atau B450 yang lebih tua. Semua AMD AM4 dan Ryzen CPU dapat dilakukan dan memori motherboard juga, tersedia di hampir semua motherboard yang cocok. Juga jika Anda mendapatkan motherboard yang mendukung overclocking, mungkin memerlukan dual atx 8pin atau 8+4 pin untuk CPU, periksa untuk memastikan catu daya Anda memilikinya.
. RAM Memungkinkan sistem operasi Anda untuk menyimpan lebih banyak data di area akses yang sangat cepat, daripada harus mengaksesnya dari perangkat penyimpanan yang lebih lambat. Versi desktop terbaru adalah DDR5, yang berguna untuk PC menanggapi snappier. Ram juga dapat dilengkapi dengan pencahayaan RGB di atas untuk mencocokkan build dan tema Anda.
Ke jumlah ram yang Anda butuhkan. RAM Terlalu sedikit membuat sistem Anda lambat, dan sementara spesifikasi minimum Windows mencantumkan 2 gigabyte atau pertunjukan, secara realistis Anda membutuhkan 8 pertunjukan ram. Kami akan merekomendasikan 16 pertunjukan memori, seperti halnya windows yang diinstal pada nvme m.2 drive, sistem Anda dapat boot dalam waktu kurang dari 20 detik dan tajam dan responsif. Dan jika Anda melakukan pengeditan foto atau video, 32 atau 64 pertunjukan dipasangkan dengan CPU yang kuat akan memberikan waktu rendering yang lebih pendek.
Selalu pasang komponen dan ram dengan power off. Pada boot pertama, DDR5 diatur ke kecepatan defaultnya, yang mulai dari 4800 Megeranz. Jika Anda membeli RAM FAST, di BIOS Anda dapat mengaktifkan Profil Memori Extended, Pengaturan XMP atau A-XMP untuk mendapatkan kecepatan penuh RAM Anda, yang tercepat hingga 6400 Mahertz, meskipun ingatlah untuk menyiapkan motherboard yang mendukung Ram Overclocking. Jika Anda overclocking, lakukan itu terlebih dahulu maka aktifkan XMP atau A-XMP. Jika Anda bermain game, frekuensi memori yang lebih tinggi berdampak pada FPS.
Antara jumlah ram yang Anda miliki dan kecepatannya, seberapa banyak Anda memiliki dampak paling besar hingga sekitar 16 gigabyte. Gamer akan menginginkan RAM FAST, jadi periksa perbandingan benchmark untuk melihat manfaat dalam permainan Anda, karena RAM kecepatan tertinggi bisa mahal.
Kartu grafis, atau GPU, unit pemrosesan grafis, adalah kartu ekspansi yang cocok dengan slot PCIe di motherboard Anda. Ini menangani instruksi grafis yang kompleks, menghitung gambar, tekstur dan objek, dan mengirimkan hasilnya ke satu atau lebih monitor. Motherboard Anda mungkin memiliki HDMI ™, DisplayPort, atau port DVI atau VGA yang lebih lama, didorong oleh GPU grafis terintegrasi di dalam beberapa prosesor. Ini menangani aplikasi desktop dasar dengan baik, tetapi tidak ada di dekat kinerja kartu grafis khusus untuk game di FPS tertinggi dan dengan detail yang dimasukkan ke maksimal.
. Di MSI, kami menawarkan kartu untuk kedua merek GPU. Untuk NVIDIA, Kartu Seri 3000 menawarkan lompatan besar selama 2000-Series. Model 30 seri saat ini sebagian besar adalah kartu penggila dari RTX 3090Ti ke RTX 3050. Sedangkan untuk AMD, kami memiliki kartu 6000-seri untuk penggemar (RX 6950 XT ke RX 6700 XT) dan tingkat kinerja (RX 6650 XT ke RX 6400).


Apakah kita sedang membicarakan drive hard disk, drive solid state atau ssds, atau nvme atau sata m.2 drive, ini semua adalah bentuk penyimpanan untuk file di komputer Anda. Penyimpanan telah berevolusi dari hard drive yang menggunakan teknologi magnetik untuk menyimpan data pada disk pemintalan. Mencapai 20 terabyte atau lebih, hard drive terabyte 4 hingga 8 adalah pilihan yang hemat biaya untuk penyimpanan massal. Tapi, dengan transfer data sekitar 140 hingga 180 megabyte per detik, kecepatan jauh dilampaui oleh SSD dan m.2 drive. Solid state drive, apakah SSD atau m.2 drive, gunakan memori untuk menyimpan data. Sedangkan memori DDR4 di komputer Anda dikosongkan saat tidak ada daya, SSD dan M.2 drive dapat menyimpan data tanpa daya. Untuk SSD, mereka menggunakan konektor SATA yang sama dengan hard drive, tetapi drive yang baik menawarkan kecepatan baca dan tulis lebih dari 500 meg per detik, tiga kali lipat kecepatan hard drive. Ini mencapai 2 kapasitas terabyte, beberapa mencapai 4 terabyte.
Ngomong -ngomong, tipe memori SSD didefinisikan berdasarkan bit per sel memori, satu per sel adalah sel level tunggal (SLC), 2 per sel multi untuk MLC, 3 sel adalah triple untuk TLC yang paling umum, dan 4 adalah Quad untuk QLC. Membutuhkan kepadatan yang lebih tinggi, pasar telah mengembangkan memori NAND 3D, melapisi memori di atas satu sama lain. Msata drive awalnya adalah untuk laptop, tetapi berubah menjadi m.2 tongkat penyimpanan yang kita lihat hari ini. Awalnya terhubung dengan SATA, versi baru terhubung langsung ke jalur PCIe motherboard untuk memberikan kecepatan cepat menyala. Ini disebut nvme atau pcie m.2 drive. Gen3 pcie m..
. Pedoman Umum- PC untuk web, Word dan Excel dapat bertahan dengan 500 hingga 600 watt. Untuk NVIDIA GPU, seri Gen RTX 2000 terakhir membutuhkan sekitar 650 hingga 750 watt. GPU RTX 3080 yang baru membutuhkan 750 watt, dan RTX 3090 kelas atas membutuhkan 850 watt atau lebih. AMD GPU memiliki kebutuhan daya yang sama, dengan Radeon RX 6800 membutuhkan 650 watt, RX 6800XT membutuhkan 750 watt, dan Radeon RX 6900XT membutuhkan 850 watt.
. Juga kartu grafis Anda akan membutuhkan konektor daya Dual, bahkan Triple 6+2 PCI, tetapi sebagian besar PSU memiliki ini.
Peringkat 80 plus perunggu, perak, emas, platinum, dan titanium memiliki peningkatan efisiensi 2 hingga 3 persen di antara tingkatan, dimulai dengan perunggu pada 82 persen, dan titanium memiliki efisiensi 92%, meskipun itu datang dengan harga. Catu daya modular dapat mengurangi kekacauan kabel di build Anda, dan dapat membuat komponen kabel dan manajemen kabel lebih mudah. Dan perhatikan bahwa konektor CPU dan PCI 6+2 mungkin terlihat sama, tetapi mereka tidak akan cocok dengan soket satu sama lain. Dengan tips ini, Anda harus dapat dengan mudah memilih PSU baru Anda.
Efisiensi energi
Program sertifikasi 80 plus untuk unit catu daya menawarkan 80 plus, 80 plus perunggu, 80 plus perak, 80 plus emas, 80 plus platinum dan 80 plus tingkat sertifikasi titanium. Tier titanium yang paling efisien (dan paling mahal) menawarkan lebih dari 90% efisiensi energi.


Aliran udara yang sangat baik karena kekacauan kabel yang lebih sedikit
Aliran udara yang baik dengan manajemen kabel yang baik
Aliran udara yang buruk karena kekacauan kabel
Pembacaan suhu rendah karena kekacauan kabel yang lebih sedikit
Manajemen kabel yang buruk akan menghasilkan suhu tinggi
Mudah diatur dan dikelola untuk ketampanan
Ketampanan dengan manajemen kabel yang bagus
Terlihat berantakan karena terlalu banyak kabel
Penggantian PSU yang nyaman
Perlu menghapus semua kabel saat beralih PSU
Dapat sepenuhnya disesuaikan
Opsi Kustomisasi Terbatas
Kustomisasi bukan opsi
Memilih casing sebagian besar dapat dilakukan pada selera pribadi, tetapi ada beberapa faktor yang perlu diingat. . Juga mencari bukaan lebar di bagian depan untuk udara masuk, dan menyaringnya akan membantu menjaga debu dari kasing. Kedua, periksa ukuran motherboard apa yang akan diterima kasus Anda, sebagian besar motherboard berukuran ATX dan tidak cocok dengan kasus yang lebih kecil.
Micro-ATX atau Mini-ATX yang lebih kecil dapat sesuai, periksa spesifikasi case, atau pertimbangkan casing yang lebih kecil agar cocok. Ketiga, Anda harus memeriksa panjang GPU yang diterima kasus ini, karena kartu grafis yang lebih baru dapat mencapai panjang 27, 30 atau hampir 33 sentimeter. Dan apakah Anda memerlukan tempat untuk SSD atau hard drive? Periksa kasing memiliki tempat pemasangan untuk penyimpanan Anda.
Selanjutnya, solusi pendingin CPU jenis apa yang akan Anda gunakan? Untuk pendinginan udara, periksa ketinggian pendinginan CPU maksimum case dalam milimeter, setidaknya beberapa mil lebih dari ketinggian pendingin Anda yang sebenarnya.
Jika Anda melakukan pendinginan cair, radiator membutuhkan tempat untuk dipasang ke case, jadi periksa lokasi pemasangan rad 240 atau 360 milimeter di bagian depan atau atas. Bagian atas adalah lokasi terbaik untuk suhu karena rad akan buang langsung di luar case. Jangan pernah memasang rad di bagian bawah casing, pompa tidak boleh berada di bagian paling atas loop cair karena jumlah udara kecil di loop akan ingin menggabungkan di sana, mengurangi efisiensi cpu coldplate dan pompa CPU dan pompa. Akhirnya, konstruksi kasus. Panel kaca tempered memamerkan internal tetapi tambahkan berat yang cukup besar, dan perawatan harus diambil saat mengangkut dan juga setelah pemasangan, bukan untuk torsi pengencang terlalu erat di kaca karena dari waktu ke waktu ini dapat menyebabkannya pecah. Dengan faktor -faktor ini dalam pikiran Anda dapat memilih casing agar sesuai dengan gaya Anda.
Ke keyboard, ada keyboard membran, yang lebih murah dan membentuk banyak pasar, dan keyboard mekanik kelas atas. Keduanya dapat memiliki fitur game seperti anti-ghosting dan rollover n-key-keyboard mendaftar N jumlah tombol yang ditekan secara bersamaan.
Keyboard mekanik memiliki sakelar di bawah setiap tombol, jenis utama adalah linear merah dengan versi merah diam juga, sakelar coklat memiliki benjolan taktil saat Anda menekan ke bawah, dan blues yang memiliki sentuhan serta suara klik yang keras.
Tikus memiliki sensor untuk melacak titik -titik per inci atau DPI di bawah mouse, semakin tinggi DPI, semakin sensitif mouse, dan semakin cepat kursor dapat bergerak di layar.
. Sebagian besar tikus game menggunakan sensor optik.
Monitor terhubung dengan satu kabel DisplayPort atau HDMI ™, dan model kelas atas mungkin memiliki input video USB-C. Seringkali ada Legacy VGA, juga dikenal sebagai input D-SUB, atau DVI. Monitor bisa datar atau melengkung, dan 1080p adalah resolusi dasar, tetapi 1440p menjadi pilihan gamer karena Anda dapat melihat lebih banyak detail game. Ada layar 4K untuk pemutaran media resolusi tinggi, dan profesional kreatif.
Refresh Rate penting bagi gamer; Sebagian besar layar 1080p dan 4K memiliki laju refresh 60 hertz, tetapi 1440p dapat melakukan 120 atau 144 hertz, ini sering merupakan tampilan tipe TN. Layar Anda dapat memperbarui dua kali lebih cepat, dan perbedaan sepersekian detik dapat membantu Anda memenangkan game online yang kompetitif. Fitur AMD Freesync atau Nvidia G-Sync dapat mengurangi sobek layar.
Anda harus memperhatikan kontras dan kecerahan, yang dinilai dalam candala atau nits, hal yang sama. Jenis panel dapat berupa switching in-plane atau IPS, dengan akurasi warna yang lebih baik dan sudut pandang yang lebih luas, atau nematik bengkok atau TN, yang dikenal dengan kecepatan refresh yang sangat cepat. Penyelarasan vertikal atau panel VA yang digunakan untuk duduk di antara keduanya, meskipun panel AMVA yang lebih baru telah meningkatkan warna, kontras dan tarif penyegaran, dan ditemukan dalam tampilan game melengkung dan ultrawide.


Apa yang harus saya ketahui untuk membangun PC game?
Jenis game apa yang Anda mainkan
Setiap game memiliki seperangkat persyaratan sistem minimum. Misalnya, game AAA sangat penting pada grafik, sementara game FPS mungkin kurang menuntutnya tetapi menekankan kualitas koneksi yang baik. Sebelum membangun komputer, kunjungi situs web yang tepat untuk mempelajari tentang persyaratan sistem game Anda. Ini akan membantu Anda menghindari pengeluaran terlalu sedikit atau terlalu banyak di PC Anda
Pilih kartu grafis yang tepat
Dua produsen GPU terkemuka adalah NVIDIA dan AMD. Di MSI, kami menawarkan kartu untuk kedua merek GPU. Untuk NVIDIA, Kartu Seri 3000 menawarkan lompatan besar selama 2000-Series. Model 30 seri saat ini sebagian besar adalah kartu penggila dari RTX 3090Ti ke RTX 3050. Sedangkan untuk AMD, kami memiliki kartu 6000-seri untuk penggemar (RX 6950 XT ke RX 6700 XT) dan tingkat kinerja (RX 6650 XT ke RX 6400).
Anda harus mempertimbangkan jumlah VRAM pada kartu karena sangat penting untuk kinerja GPU Anda. Faktor lain yang harus Anda pikirkan adalah memiliki penggemar yang sangat baik untuk pendinginan yang efisien dan efektif. Game pada 1440p membutuhkan hampir dua kali lipat (2x), dan 4K membutuhkan quadruple (4x) kekuatan yang diperlukan untuk menjalankan game di 1080p. Tingkat refresh cepat 120 atau 144-hertz adalah dua kali lipat standar 60 hertz, jadi ada penggandaan lain atau lebih dari kekuatan grafis yang diperlukan untuk mengendarainya.
Kurangi waktu pemuatan game dengan SSD
Waktu pemuatan adalah masalah bagi banyak gamer di seluruh dunia. Ini terutama dipengaruhi oleh kecepatan dan penyimpanan jaringan Anda. Oleh karena itu, cara lain untuk meningkatkan pengalaman bermain game adalah dengan menggunakan drive SSD (solid state drive) yang menawarkan kecepatan baca/ tulis yang lebih tinggi. Ini akan mengurangi waktu pemuatan game dan meningkatkan respons umum sistem Anda.
Pilih motherboard yang tepat
Tidak hanya motherboard game yang baik memungkinkan untuk peningkatan di masa depan, tetapi juga menawarkan komunikasi suara latensi rendah untuk pengalaman bermain game yang ditingkatkan. Pejabat MSI terbaik dari situs web terbaik dapat membantu Anda menemukan motherboard terbaik untuk bermain game agar sesuai dengan kebutuhan game Anda.

Cara menyesuaikan pc unik?
Selain kinerja tinggi, banyak pengguna PC juga lebih memperhatikan penyesuaian PC mereka sendiri, dari penampilannya hingga aksesorinya.Ingin rig pribadi Anda sendiri? Beberapa langkah sederhana adalah semua yang Anda butuhkan untuk membuat komputer game Anda benar -benar unik.
Mulailah dengan skema warna
- Putih: MPG Z690 Force WiFi/ MSI Mag B660M Mortir WiFi
- All-Black: Meg Z690 Unify
- Biru: Mag Z690 Torpedo
- Hijau: Mag B660m Bazooka
Sebagai titik awal, mendapatkan komponen yang cocok dari seri yang sama membantu mempertahankan tema warna yang konsisten di seluruh rig Anda.
Saat ini, banyak komputer dilengkapi dengan perangkat pencahayaan RGB. Anda dapat menambahkan pencahayaan dengan memasang strip LED atau memilih komponen yang sudah dilengkapi dengan RGB. Pencampuran dan pencocokan yang tepat adalah kunci untuk mendapatkan efek pencahayaan yang indah. Sinkronisasi Lampu Mistik MSI memungkinkan Anda untuk menghubungkan dan mengontrol perangkat RGB di dalam dan di luar kasing, memberikan pengalaman pencahayaan baru berkat berbagai pengaturan warna dan mode.
Sementara lampu RGB biasanya berjalan pada daya 12V, LED digital yang berjalan pada daya 5V juga tersedia. LED digital (pencahayaan argb) memiliki potensi luar biasa untuk kustomisasi dengan memungkinkan pengguna untuk menyesuaikan warna pencahayaan pada tingkat mikro-memungkinkan untuk kontrol yang lebih halus. Pengguna akan memiliki pengalaman yang jauh lebih fleksibel saat bekerja dengan pencahayaan argb di sistem mereka.

Cara menginstal perangkat RGB
- Periksa definisi header pin pada aksesori RGB yang dibeli dan motherboard (misalnya, 12V/5V)
- Colokkan konektor RGB 4-pin (3-pin) ke header RGB di motherboard
- Colokkan konektor daya tambahan saat menghubungkan aksesori RGB jika perlu
- Ø Untuk penggemar, terhubung ke konektor kipas di motherboard
- Ø Untuk produk non-fan, sambungkan ke konektor 4-pin dari catu daya
Sistem Pendingin Air Kustom
Solusi pendingin air khusus menempatkan tuntutan yang lebih tinggi pada keterampilan, tetapi merupakan cara yang baik untuk membedakan rig Anda dari yang lain. Solusi Pendingin Air Kustom Yang Menggunakan Pembengkokan Pipa Dapat Menghindari Kusut Pipa yang Sering Ditemukan Dalam Sistem AIO.
Streaming langsung telah menjadi bentuk media baru yang sangat diperlukan di era internet, memungkinkan Anda untuk berbagi keterampilan bermain game dan pengalaman dengan teman -teman dari jarak jauh. . Berikut adalah beberapa saran berguna yang harus Anda ketahui sebelum Anda mulai.
Apa yang harus saya ketahui untuk membangun PC streaming?
Gameplay dan kualitas streaming
Setiap permainan memiliki persyaratan perangkat keras minimum dan direkomendasikan, tetapi ketika datang untuk streaming pada kualitas yang layak, persyaratan minimum tidak akan cukup baik. Secara umum, aliran 1080p, 60fps/30fps adalah titik yang sangat baik untuk memulai. Kinerja CPU dan GPU Anda memainkan peran penting dalam hal beban kerja khusus ini.

Apakah internet Anda cukup cepat?
Koneksi 20MB/s lebih dari cukup untuk sebagian besar tujuan streaming. Anda bahkan dapat memiliki pengalaman streaming yang lancar hanya dengan menambatkan koneksi internet dengan ponsel Anda jika Anda memiliki kekuatan dan kecepatan sinyal yang konsisten di area Anda.
Pilih prosesor yang tepat
CPU memengaruhi kinerja langsung dan permainan langsung, jadi dengan pengaturan streaming PC tunggal, pastikan prosesor Anda sesuai dengan tugas tersebut. . Kami merekomendasikan setidaknya prosesor level R7/i7 untuk streaming berkualitas tinggi yang stabil.
Kami merekomendasikan setidaknya 16GB DDR4 RAM untuk streaming langsung.
Terlepas dari jenis pengaturan streaming yang Anda pilih, Anda akan memerlukan aplikasi yang menangkap dan menyoroti konten Anda ke audiens Anda. Meskipun ada banyak cara untuk melakukan ini, yang paling populer yang digunakan oleh streamer saat ini adalah:
Panduan Lengkap untuk Membangun PC
Dapatkan pengetahuan langsung tentang pembangunan PC dan pelajari cara membangun.