Come trasmettere in streaming in live per un evento in diretta YouTube, come trovare streaming live su YouTube: 10 passaggi (con immagini)
Come trovare streaming live su YouTube
È facile usare il webcaster X1 per trasmettere in streaming per un evento live YouTube esistente.
Come trasmettere in streaming per un evento live di YouTube
YouTube ti consente di creare, gestire e programmare un elenco di prossimi eventi dal vivo per il tuo canale YouTube.
- Imposta tutti i dettagli (titolo, descrizione, parole chiave, ecc.) In anticipo, anche se farai altri flussi live tra oggi e il tempo del tuo evento.
- Condividi l’URL unico dell’evento con i tuoi abbonati su una serie di canali, anche giorni o settimane prima dell’evento.
- Anteprima il tuo live streaming prima di andare in diretta.
- La tua fotocamera HDMI per lo streaming
- Il tuo webcaster x1 per YouTube
- Una connessione Internet con uplink da 4 mb/s si noti che per impostazione predefinita ogni webcaster x1 per YouTube si connette alla tua rete ha bisogno di una larghezza di banda di uplink costante di 4 MB/s. Puoi utilizzare i popolari test di velocità Internet per determinare la larghezza di banda di picco che hai a disposizione, ma sii cauto con questo valore poiché altre persone e dispositivi, compresi i sistemi telefonici a IP voice over, possono utilizzare una parte significativa del tuo uplink disponibile.
- Un display HDMI (che supporta il video 1080p)
- Facoltativamente, una tastiera
- Collega tutto e accendi il webcaster x1 .
- Collegare il cavo di alimentazione fornito a Webcaster X1 .
- Collega il tuo display alla porta HDMI.
- Collega il cavo Ethernet alla porta Ethernet.
- Collega il mouse a una delle porte USB.
- (Facoltativo) Collegare la tastiera a un’altra porta USB.
- .
- Se non già effettuato l’accesso, autorizza il webcaster X1 a trasmettere in streaming sul tuo canale YouTube.
- Fai clic sull’icona delle preferenze nell’angolo in basso a destra dello schermo; La schermata delle preferenze si apre.
- Scorri fino in fondo all’elenco e assicurati che l’avvio automatico dello streaming dopo l’accesso dell’utente non sia verificato.
- .
- Autorizza il webcaster X1 per YouTube sul tuo canale YouTube.
- Assicurati che il tuo webcaster X1 sia connesso a Internet.
- Apri un browser Web sul tuo computer, tablet o dispositivo mobile.
- Vai a Google..
- Se necessario, accedi al tuo account Google.
- Se gestisci più di un canale YouTube, scegli il canale in cui si desidera trasmettere in streaming.
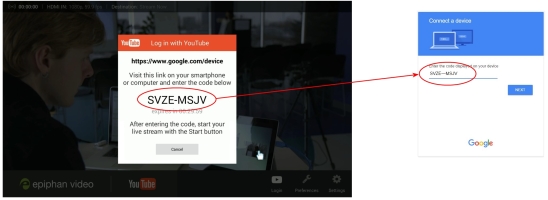
- Sul display allegato al webcaster X1, una casella di messaggio dice accedi con YouTube (se questo messaggio non viene visualizzato, fare clic sull’icona di accesso). .

- (Opzionale) In alternativa, lo stesso codice del dispositivo è disponibile dalla schermata di Webcaster X1. Immettere questo codice nella casella del codice del dispositivo nella pagina di accoppiamento di Google.
- Fai clic su Avanti, quindi consenti alla finestra di accoppiamento di Google di autorizzare il Webcaster X1 a trasmettere in streaming sul tuo canale YouTube.
- Apri una finestra del browser sul tuo computer, tablet o dispositivo mobile.
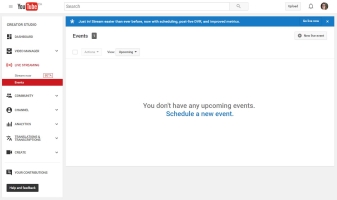
- Vai alla pagina degli eventi live di YouTube www.Youtube.com/my_live_events.
- Fai clic su Pianifica un nuovo evento .

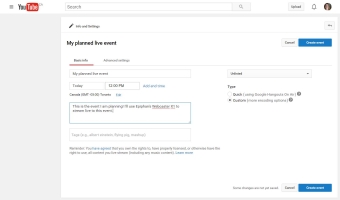
- Immettere una data, ora, nome e descrizione per il tuo evento.
- Seleziona la privacy del tuo evento e fai clic su Crea evento .

- .

- Non c’è bisogno di configurare nient’altro! .

- Configura le tue impostazioni di live streaming.
- .
- .
- Seleziona l’evento su cui si desidera trasmettere in streaming.
- Nota: Le informazioni tra parentesi dopo il nome dell’evento mostrano lo stato e la privacy del tuo evento.
- . Se questo non è controllato, il tuo flusso andrà in diretta senza una fase di anteprima.
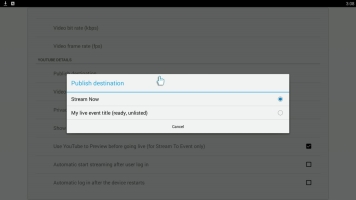
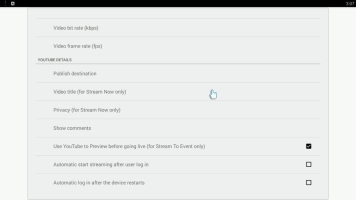
- (Opzionale) Configurare aspetti del tuo flusso di YouTube. (Nota che quando lo streaming su un evento live, la privacy e il titolo video sono configurabili solo tramite il tuo dashboard di evento live YouTube.
- .
- .
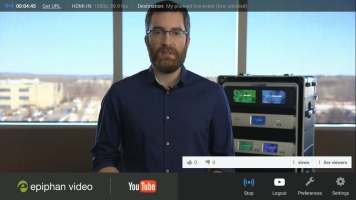
- Sotto i commenti puoi vedere i pollici in su e i pollici in giù, nonché un conteggio di viste totali e spettatori dal vivo.
- Puoi scegliere di avere questi mostrati sul lato sinistro o destro dello schermo.
- Se non già nella pagina Preferenze, fare clic sull’icona delle preferenze nell’angolo in basso a destra dello schermo; La schermata delle preferenze si apre.
- .
- Seleziona la posizione per i commenti.
- Quando il tuo flusso inizia, vedrai un conteggio dei visualizzatori dal vivo e commenti sul lato prescelto dello schermo.
Durante il Livestream, fai clic sul pulsante sinistro del mouse del mouse collegato a Webcaster X1 per mostrare o nascondere il Webcaster X1 Overlay (inclusi i commenti, se hai configurato il dispositivo per mostrarli).
Il mouse USB o la tastiera devono essere connessi a Webcaster X1 per YouTube prima di avviare.
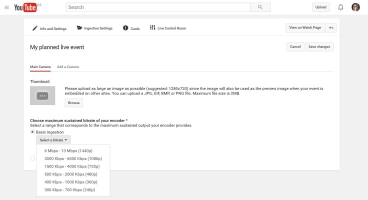
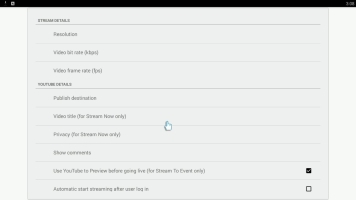
- La risoluzione è la dimensione di ogni frame e talvolta viene chiamata dimensione del telaio.
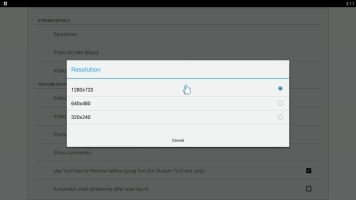
- Di solito questi valori sono espressi come una coppia di valori come 1280 × 720. .
- Alcune risoluzioni hanno anche forme brevi. Ad esempio 720p o HD significa 1280 × 720.
- Maggiore è la risoluzione (più grande), più dati necessari per descrivere accuratamente tutto nel tuo video.
- Se hai una larghezza di banda uplink limitata, è necessario trovare un equilibrio tra dimensione del frame e rate di frame che rende il tuo video il più buono possibile al tuo bit rate attuale.
- È possibile configurare la risoluzione che il webcaster X1 invia a YouTube .
- Nota: Non puoi cambiare la risoluzione durante la tua trasmissione in diretta. Se lo modifichi durante lo streaming, la modifica ha effetto solo quando si interrompe il flusso corrente e si avvia un altro.
- .
- Fare clic su Risoluzione nella sezione Dettagli del flusso.
- Usa il mouse USB connesso per selezionare la velocità bit per il tuo live streaming.
- Nota: Quando ottieni per la prima volta il tuo webcaster x1 per YouTube, la risoluzione predefinita è 1280 × 720 . In tutti gli usi successivi dopo il primo utilizzo, la dimensione del frame predefinita è qualunque cosa imposta l’ultima volta.
- Se hai finito con le impostazioni per il tuo live streaming, fai clic con il pulsante destro del mouse per uscire dal menu Preferenze.
Il mouse USB o la tastiera devono essere connessi a Webcaster X1 prima di avviare.
- La velocità del frame è una misura del numero di frame viene inviato ogni secondo e spesso viene definito frame al secondo e fps abbreviato .
- Maggiore è la frequenza dei fotogrammi, maggiore è l’azione nel tuo video. .
- Maggiore è la frequenza dei fotogrammi, più dati si inviano sopra il tuo uplink.
- .
- YouTube ha specifiche per la velocità massima che accettano. Attualmente questo valore è di 30 fps.
- È possibile configurare il frame rate che il webcaster x1 invia a YouTube .
- Non è possibile modificare la frequenza dei fotogrammi durante la trasmissione. Se lo modifichi durante lo streaming, la modifica ha effetto solo quando si interrompe il flusso corrente e si avvia un altro.
- .
- Fare clic su Video Frame Rate (FPS) nella sezione Dettagli del flusso.
- Usa il tuo mouse USB collegato per selezionare la frequenza dei fotogrammi per il tuo live streaming.

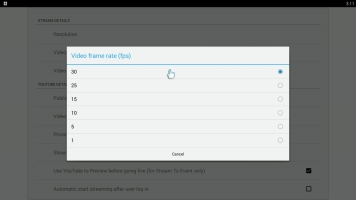
- Quando ottieni per la prima volta il tuo webcaster x1, la frequenza dei frame predefinita è 30 . .
- Se hai finito con le impostazioni di YouTube per la trasmissione, fai clic con il pulsante destro del mouse per uscire dal menu Preferenze.
Il mouse USB o la tastiera devono essere connessi a Webcaster X1 prima di avviare.
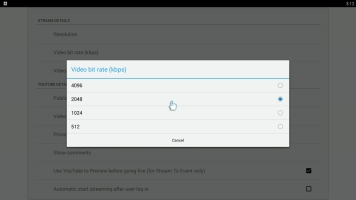
- Il bit rate è una misura di quanti bit di dati vengono inviati ogni secondo e spesso viene definito kilobit al secondo e abbreviato KBPS .
- Maggiore è la velocità bit, più dati per frame e quindi più dettagli vedrai nel tuo video.
- Tariffi più elevati inviano più dati sul tuo uplink, quindi a volte è necessario avere un bit rate per evitare di sovraccaricare la connessione Internet.
- È possibile configurare la velocità bit che il webcaster X1 invia a YouTube .
- Non puoi cambiare il bit rate durante la tua trasmissione. .
- Se non già nella pagina Preferenze, fare clic sull’icona delle preferenze nell’angolo in basso a destra dello schermo; La schermata delle preferenze si apre.
- Fai clic su Video Bit Rate (KBPS) nella sezione Dettagli del flusso.
- Usa il mouse USB connesso per selezionare la velocità bit per il tuo live streaming.
- Nota: . .
- Se hai finito con le impostazioni di YouTube per la trasmissione, fai clic con il pulsante destro del mouse per uscire dal menu Preferenze.
Il mouse USB o la tastiera devono essere connessi a Webcaster X1 prima di avviare.
- Fare clic sul pulsante destro del mouse per tornare alla schermata principale.
- !
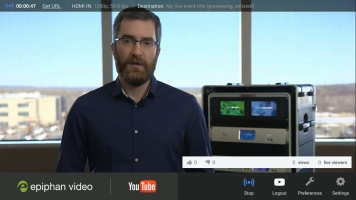
- Quando sei pronto per iniziare lo streaming, fai clic sull’icona di avvio .
- Dopo alcuni momenti (in cui il webcaster X1 sta comunicando con il tuo account YouTube), la barra delle informazioni nella parte superiore dello schermo si aggiorna per indicare che è live . Se hai controllato l’utilizzo di YouTube per visualizzare l’anteprima prima di andare in diretta nella casella di controllo in precedenza, il flusso non va automaticamente in diretta, ma invece rimane nello stato pronto fino a quando non intraprendi ulteriori azioni dalla tua sala di controllo su YouTube Live.
-
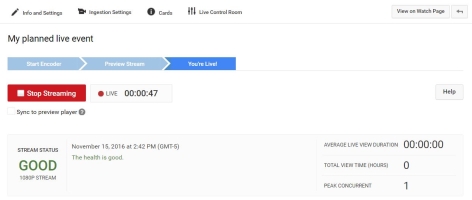
- Torna alla tua finestra del browser YouTube e vai nella sala di controllo dal vivo per il tuo evento (può essere trovato dalla pagina di YouTube My Live Events).
- . Se non è buono, verifica la connessione Internet del webcaster x1.

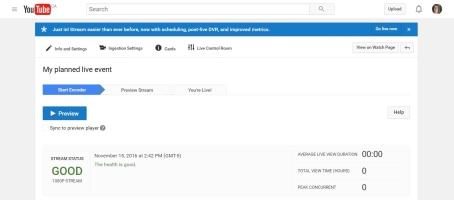
- . Allo stesso tempo, il webcaster X1 aggiorna la barra delle informazioni per indicare che stai testando (anteprima).

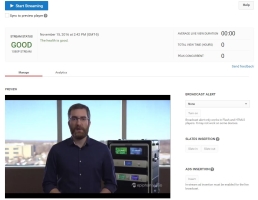
- Quando sei pronto, fai clic su Inizia in streaming, YouTube inizia il tuo evento in diretta. .

.
- .
- .
Ora che il tuo evento di YouTube Live è completo, non puoi più trasmettere in streaming. .
Come trovare streaming live su YouTube
Questo articolo è stato scritto dallo scrittore dello staff di Wikihow, Darlene Antonelli, MA. . . Ha guadagnato un Master per iscritto alla Rowan University nel 2012 e ha scritto la sua tesi sulle comunità online e le personalità curate in tali comunità.
Questo articolo è stato visto 40.553 volte.
Questo wikihow ti insegna come trovare video in streaming live su YouTube usando un computer, un telefono o un tablet. .


Fair Use (screenshot)
\ n “>Apri YouTube sul tuo telefono o tablet. Questa icona dell’app sembra un pulsante di riproduzione rossa e bianca. Lo troverai nella tua schermata principale, nel cassetto dell’app o dalla ricerca.

Fair Use (screenshot)
\ n “>
Tocca l’icona di ricerca

. .

\ n “>
Digita una parola chiave nella barra di ricerca e premi il tasto di ricerca. Quando lo fai, vedrai un elenco di risultati. Vedrai quali sono dal vivo se hanno la parola “live” all’interno della miniatura.

\ n “>
Tocca l’icona del filtro

. . Una scatola verrà visualizzata.

Fair Use (screenshot)
\ n “>Rubinetto . .

Rubinetto Fare domanda a . Questo filtra i risultati da visualizzare solo video in diretta.
Fair Use (screenshot)
\ n “>- .


Fair Use (screenshot)
\ n “>.Youtube.com In un browser web. Puoi utilizzare un browser Web sul tuo computer o telefono ed entrambi funzionano in modo simile.


Fair Use (screenshot)
\ n “>- Se non vedi il Vivere Opzione, fare clic sulle tre linee orizzontali nell’angolo in alto a sinistra della pagina per aprire il menu.
- È possibile fare clic sul pulsante “iscriviti” rosso per iscriverti al canale live e ritrovarlo facilmente.


Fair Use (screenshot)
\ n “>- Per interagire con la chat dal vivo, puoi digitare il campo di testo “Say Something” e premere ↵ Invio o ⏎ Restituisci .
- Puoi mettere in pausa uno streaming live e il video riprenderà a giocare da dove hai interrotto, quindi sarai dietro lo streaming live.
Domande e risposte esperte
Includi il tuo indirizzo email per ricevere un messaggio quando a questa domanda viene data una risposta.
I video in diretta sono contrassegnati con un’icona rossa.
Tutte le comunicazioni di suggerimento vengono attentamente riviste prima di essere pubblicate
Grazie per aver inviato un suggerimento per la revisione!

Potrebbe piacerti anche


Bypass Age Restrizioni sui video di YouTube: 8 semplici metodi

5 modi per bloccare i pantaloncini YouTube: estensioni, app e altro ancora

3 trucchi per scaricare parte di un video di YouTube in qualità HD

5 modi per guardare YouTube sbloccato su un computer scolastico

4 modi semplici per scaricare musica da YouTube: Mobile e desktop


11 modi per entrare in contatto con la star di YouTube Mrbeast

12 modi per fare soldi su YouTube: annunci, abbonamenti e altro ancora

8 Modi semplici per contattare il supporto YouTube

Come scaricare audio da YouTube


7 metodi per bloccare gli annunci su YouTube

4 modi per scaricare video di YouTube su Android
Per un elenco completo delle differenze tra lo streaming in un evento dal vivo vs stream ora, vedere Set Publish Destination.
È facile usare il webcaster X1 per trasmettere in streaming per un evento live YouTube esistente.
Per trasmettere in streaming sul tuo evento in diretta YouTube hai bisogno:
Questi esempi mostrano come trasmettere in streaming una fotocamera HDMI, ma è possibile utilizzare qualsiasi altra fonte HDMI che ti piace (fotocamera, computer, mixer video, ecc.), fintanto che la tua fonte (o media) non ha una protezione dei contenuti digitali ad alta larghezza di banda (HDCP).